Most Cisco devices (including routers and switches) use a CLI (Command Line Interface) to configure the network device. The CLI is an interface, based on text. You type in configuration commands and use show commands to get the output from the router or switch. There are also GUIs (Graphical User Interface) for the routers, switches and firewalls but the majority of the work is done on the CLI.
This might sound dated but with so many commands that are available to use, the CLI is much easier to work with than any of the graphical interfaces. It’s also much easier to copy entire configurations from one device to another.
In this lesson, I’ll explain how to access the CLI and the basics of how Cisco IOS works.
Before we can enter any commands, we need access to the CLI. There are three options:
The console is a physical port on the switch that allows access to the CLI. We typically use this the first time we configure the switch. Telnet and SSH are both options for remote access.
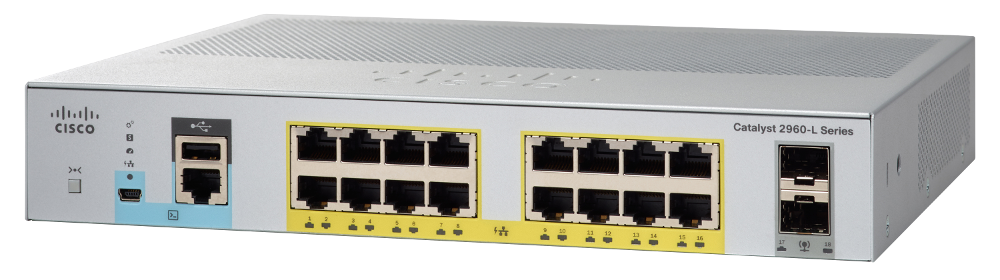
On the switch, you will find one or two physical connectors for the console. Take a look at the picture below:
On the left side of this 2960 Catalyst switch, you see the light blue RJ45 port and a micro-USB port on the left of it. Older switches only have the RJ45 port, newer switches (and other devices) often have both options.
Even though it’s an RJ45 port, it’s not an Ethernet port. We use this connection to connect the switch to a serial port on your computer with the following cable:
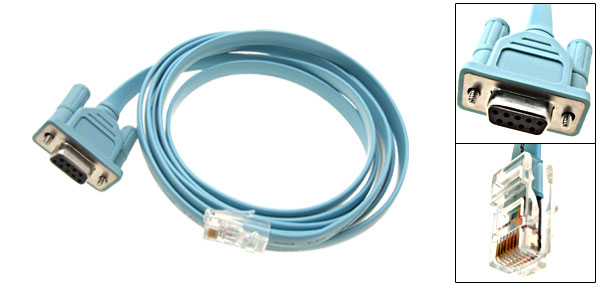
This cable is called a Cisco console cable and you will need a serial port on your computer. Modern computers or laptops don’t have these serial ports anymore so you might have to use a serial-to-USB cable like this one:
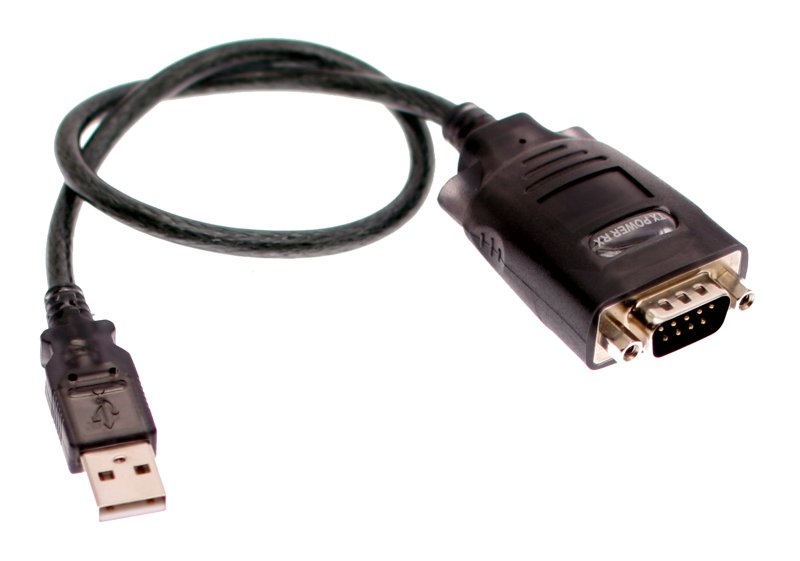
This cable emulates a serial port and has a USB connection. Once you have connected your computer to the switch, we can start a terminal application to access the CLI.
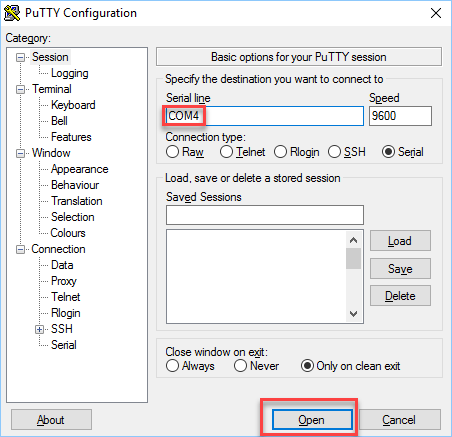
There are many terminal emulator applications. If you are new to this, the best one to start with is Putty. It’s free and allows you to connect using a serial connection, telnet and SSH. Once you have downloaded it, you will see the main screen:
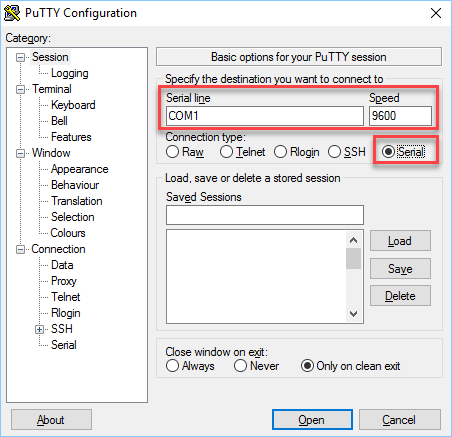
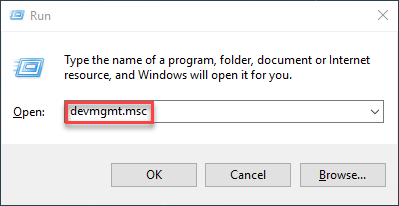
Make sure you select the “Serial” option. The default speed is 9600 (baud rate). The COM port will depend on your computer, it might be COM1 but if you are unsure, check the device manager in Windows. Click on Start > Run and enter “devmgmt.msc”:
Here is the device manager:
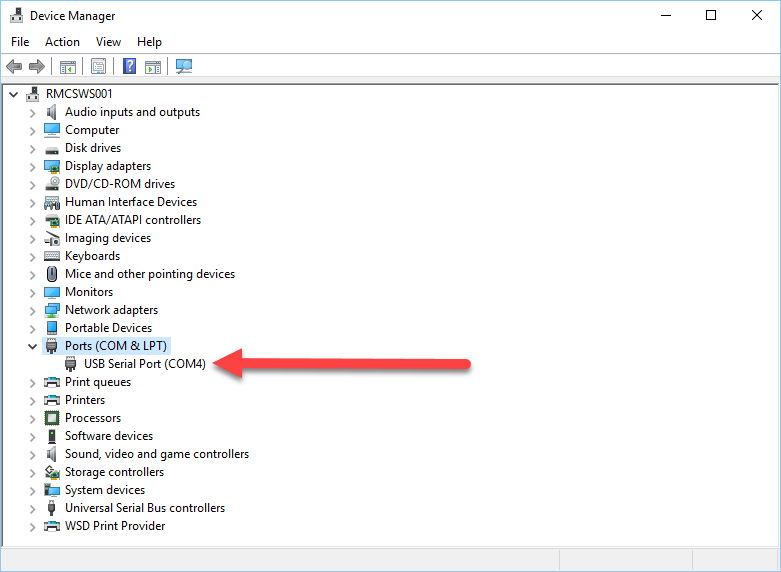
Above you can see that on my computer, I have to use COM4. Change the COM port and click on Open to start the console:
Now is a good time to power on your switch or in case it is already powered on, pull the plug so it can reload.
When the switch boots, you will see a lot of stuff on the console. First, it will initialize the flash memory:
Boot Sector Filesystem (bs) installed, fsid: 2 Base ethernet MAC Address: 00:11:bb:0b:36:00 Xmodem file system is available. The password-recovery mechanism is disabled. Initializing Flash. flashfs[0]: 14 files, 4 directories flashfs[0]: 0 orphaned files, 0 orphaned directories flashfs[0]: Total bytes: 15998976 flashfs[0]: Bytes used: 12794368 flashfs[0]: Bytes available: 3204608 flashfs[0]: flashfs fsck took 9 seconds. . done Initializing Flash. done.Initializing the flash memory is required since it contains the IOS image (Operating System) of the switch. Its next step is to load the IOS image from the flash memory:
Loading "flash:/c3560-ipservicesk9-mz.122-55.SE10.bin". @@@@@@@@@@@@@@@@@@@@@@@@@@@@@@@@@@@@@@@@@@@@@@@@@@@@@@@@@@@@@@@@@@@@@@@@@@@@@@@@@@@@@@@@@@@@@@@@@@@@@@@@@@@@@@@@@@@@@@@@@@@@@ File "flash:/c3560-ipservicesk9-mz.122-55.SE10.bin" uncompressed and installed, entry point: 0x1000000 executing. The IOS image is compressed so the switch uncompresses the image and loads it in RAM. You are then presented with some legal information and information about the switch:
Restricted Rights Legend Use, duplication, or disclosure by the Government is subject to restrictions as set forth in subparagraph (c) of the Commercial Computer Software - Restricted Rights clause at FAR sec. 52.227-19 and subparagraph (c) (1) (ii) of the Rights in Technical Data and Computer Software clause at DFARS sec. 252.227-7013. cisco Systems, Inc. 170 West Tasman Drive San Jose, California 95134-1706 Cisco IOS Software, C3560 Software (C3560-IPSERVICESK9-M), Version 12.2(55)SE10, RELEASE SOFTWARE (fc2) Technical Support: http://www.cisco.com/techsupport Copyright (c) 1986-2015 by Cisco Systems, Inc. Compiled Wed 11-Feb-15 11:34 by prod_rel_team Image text-base: 0x01000000, data-base: 0x02F00000
This tells us the version of the IOS image. IOS is now up and running, it also initializes the flash memory:
Initializing flashfs. flashfs[1]: 14 files, 4 directories flashfs[1]: 0 orphaned files, 0 orphaned directories flashfs[1]: Total bytes: 15998976 flashfs[1]: Bytes used: 12794368 flashfs[1]: Bytes available: 3204608 flashfs[1]: flashfs fsck took 1 seconds. flashfs[1]: Initialization complete. done Initializing flashfs.IOS starts with a POST (Power on Self Test) for some of the switch components:
POST: CPU MIC register Tests : Begin POST: CPU MIC register Tests : End, Status Passed POST: PortASIC Memory Tests : Begin POST: PortASIC Memory Tests : End, Status Passed POST: CPU MIC interface Loopback Tests : Begin POST: CPU MIC interface Loopback Tests : End, Status Passed POST: PortASIC RingLoopback Tests : Begin POST: PortASIC RingLoopback Tests : End, Status Passed POST: Inline Power Controller Tests : Begin POST: Inline Power Controller Tests : End, Status Passed POST: PortASIC CAM Subsystem Tests : Begin POST: PortASIC CAM Subsystem Tests : End, Status Passed POST: PortASIC Port Loopback Tests : Begin POST: PortASIC Port Loopback Tests : End, Status Passed Waiting for Port download. CompleteIt then warns us about the cryptographic features:
This product contains cryptographic features and is subject to United States and local country laws governing import, export, transfer and use. Delivery of Cisco cryptographic products does not imply third-party authority to import, export, distribute or use encryption. Importers, exporters, distributors and users are responsible for compliance with U.S. and local country laws. By using this product you agree to comply with applicable laws and regulations. If you are unable to comply with U.S. and local laws, return this product immediately. A summary of U.S. laws governing Cisco cryptographic products may be found at: http://www.cisco.com/wwl/export/crypto/tool/stqrg.html If you require further assistance please contact us by sending email to export@cisco.com.You might be wondering what a switch has to do with cryptography. Depending on your IOS image, your switch is able to run SSH server. This allows encrypted remote access. Another feature that uses cryptography is SNMP version 3, this is used by network management software to read statistics from the switch. In certain countries, cryptography is forbidden or limited.
The final part of the boot process gives us some general information about the switch:
cisco WS-C3560-24PS (PowerPC405) processor (revision G0) with 131072K bytes of memory. Processor board ID CAT0832N0G3 Last reset from power-on 1 Virtual Ethernet interface 24 FastEthernet interfaces 2 Gigabit Ethernet interfaces The password-recovery mechanism is disabled. 512K bytes of flash-simulated non-volatile configuration memory. Base ethernet MAC Address : 00:11:BB:0B:36:00 Motherboard assembly number : 73-9299-01 Power supply part number : 341-0029-03 Motherboard serial number : CAT083107CZ Power supply serial number : DTH08282MZA Model revision number : G0 Motherboard revision number : E0 Model number : WS-C3560-24PS-S System serial number : CAT0832N0G3 Top Assembly Part Number : 800-24791-01 Top Assembly Revision Number : K0 Version ID : N/A Hardware Board Revision Number : 0x09 Switch Ports Model SW Version SW Image ------ ----- ----- ---------- ---------- * 1 26 WS-C3560-24PS 12.2(55)SE10 C3560-IPSERVICESK9-MAbove we can see the switch model, the interfaces it has, some serial numbers, etc. It ends with the following message:
Press RETURN to get started!Now it’s up to us to configure the switch.
Depending if your switch already has a configuration or not, you might see the following message:
--- System Configuration Dialog --- Enable secret warning ---------------------------------- In order to access the device manager, an enable secret is required If you enter the initial configuration dialog, you will be prompted for the enable secret If you choose not to enter the intial configuration dialog, or if you exit setup without setting the enable secret, please set an enable secret using the following CLI in configuration mode- enable secret 0 ---------------------------------- Would you like to enter the initial configuration dialog? [yes/no]:
If there is no configuration, the switch will ask you if you would like to follow a wizard called the initial configuration dialog. If you see this, type “no” to continue so that we can start with a blank configuration. We will configure the device ourselves.
Once the switch has booted and we have pressed the enter key, we end up in what we call the user mode or user EXEC mode. In this mode, we have permission to use some simple commands but we are restricted to configure anything or use some more advanced commands.
Right now, the command line will show you this:
Switch>The > symbol tells us that we are currently in user mode. To get full access to the switch, we have to enter privileged mode, also called enabled mode. Here is how to do this:
Switch>enable Switch#Above you can see that the > symbol changed to #. This tells us we are now in enabled mode, granting us full access to the switch. bliep…
Switch#disable Switch>The disable command lets you jump back to user mode.
If you are using used hardware, it’s possible that the previous owner did not erase the configuration of the switch. To start with a clean slate, we’ll wipe the configuration of the switch before we continue. Here’s how to do this:
Switch#erase startup-config Erasing the nvram filesystem will remove all configuration files! Continue? [confirm] [OK] Erase of nvram: completeType erase startup-config and the switch will ask you to remove all configuration files. Between the brackets, you see confirm. If you see anything between [] you only have to press enter. You don’t have to type “confirm”.
Switches also store VLAN (Virtual LAN) information in another file. What a VLAN is and what it does is something that we will cover in another lesson, for now, let’s just make sure it is deleted. Here’s how to do it:
Switch#delete flash:vlan.dat Delete filename [vlan.dat]? Delete flash:vlan.dat? [confirm]Type delete flash:vlan.dat to delete the file. You only have to press enter to confirm what Cisco IOS tells us between the brackets. If you get an error that there is no such file, do not worry. It means someone else already deleted the VLAN information and you can continue.
Type reload and the switch will reboot:
Switch#reload Proceed with reload? [confirm]Once the switch has reloaded, we can try something else…
The show command is probably the most used command for Cisco IOS. We can use it to fetch any information from the switch. Let’s start with a simple example, let’s say we want to see some general information about the switch:
Switch#show version Cisco IOS Software, C3560 Software (C3560-IPSERVICESK9-M), Version 12.2(55)SE10, RELEASE SOFTWARE (fc2) Technical Support: http://www.cisco.com/techsupport Copyright (c) 1986-2015 by Cisco Systems, Inc. Compiled Wed 11-Feb-15 11:34 by prod_rel_team Image text-base: 0x01000000, data-base: 0x02F00000 ROM: Bootstrap program is C3560 boot loader BOOTLDR: C3560 Boot Loader (C3560-HBOOT-M) Version 12.2(44)SE5, RELEASE SOFTWARE (fc1) Switch uptime is 54 minutes System returned to ROM by power-on System image file is "flash:/c3560-ipservicesk9-mz.122-55.SE10.bin" This product contains cryptographic features and is subject to United States and local country laws governing import, export, transfer and use. Delivery of Cisco cryptographic products does not imply third-party authority to import, export, distribute or use encryption. Importers, exporters, distributors and users are responsible for compliance with U.S. and local country laws. By using this product you agree to comply with applicable laws and regulations. If you are unable to comply with U.S. and local laws, return this product immediately. A summary of U.S. laws governing Cisco cryptographic products may be found at: http://www.cisco.com/wwl/export/crypto/tool/stqrg.html If you require further assistance please contact us by sending email to export@cisco.com. cisco WS-C3560-24PS (PowerPC405) processor (revision G0) with 131072K bytes of memory. Processor board ID CAT0832N0G3 Last reset from power-on 1 Virtual Ethernet interface 24 FastEthernet interfaces 2 Gigabit Ethernet interfaces The password-recovery mechanism is disabled. 512K bytes of flash-simulated non-volatile configuration memory. Base ethernet MAC Address : 00:11:BB:0B:36:00 Motherboard assembly number : 73-9299-01 Power supply part number : 341-0029-03 Motherboard serial number : CAT083107CZ Power supply serial number : DTH08282MZA Model revision number : G0 Motherboard revision number : E0 Model number : WS-C3560-24PS-S System serial number : CAT0832N0G3 Top Assembly Part Number : 800-24791-01 Top Assembly Revision Number : K0 Version ID : N/A Hardware Board Revision Number : 0x09 Switch Ports Model SW Version SW Image ------ ----- ----- ---------- ---------- * 1 26 WS-C3560-24PS 12.2(55)SE10 C3560-IPSERVICESK9-M Configuration register is 0xFThe show version command gives us a lot of information about the switch, including the model, IOS image, and more. What if we want to see what MAC addresses the switch has learned? There is another command for that:
Switch#show mac address-table dynamic Mac Address Table ------------------------------------------- Vlan Mac Address Type Ports ---- ----------- -------- ----- 1 0050.568e.d3c8 DYNAMIC Fa0/12 Total Mac Addresses for this criterion: 1The show mac address-table dynamic command tells us all MAC addresses that the switch has learned. In this example, it only learned one MAC address on interface Fa0/12 (FastEthernet port 12).
What if we want to see the entire configuration of the switch? There’s a show command for that:
Switch#show running-config Building configuration. Current configuration : 1237 bytes ! version 12.2 no service pad service timestamps debug datetime msec service timestamps log datetime msec no service password-encryption ! hostname Switch ! boot-start-marker boot-end-marker ! ! ! ! no aaa new-model system mtu routing 1504 ! ! ! ! ! ! ! ! spanning-tree mode pvst spanning-tree extend system-id ! vlan internal allocation policy ascending ! ! ! ! interface FastEthernet0/1 ! interface FastEthernet0/2 ! interface FastEthernet0/3 ! interface FastEthernet0/4 ! interface FastEthernet0/5 ! interface FastEthernet0/6 ! interface FastEthernet0/7 ! interface FastEthernet0/8 ! interface FastEthernet0/9 ! interface FastEthernet0/10 ! interface FastEthernet0/11 ! interface FastEthernet0/12 ! interface FastEthernet0/13 ! interface FastEthernet0/14 ! interface FastEthernet0/15 ! interface FastEthernet0/16 ! interface FastEthernet0/17 ! interface FastEthernet0/18 ! interface FastEthernet0/19 ! interface FastEthernet0/20 ! interface FastEthernet0/21 ! interface FastEthernet0/22 ! interface FastEthernet0/23 ! interface FastEthernet0/24 ! interface GigabitEthernet0/1 ! interface GigabitEthernet0/2 ! interface Vlan1 no ip address ! ip classless ip http server ip http secure-server ! ! ! ! ! line con 0 line vty 5 15 ! endThe show running-config command gives us the entire active configuration of the switch. Even though we haven’t configured anything yet, there is a basic configuration.
In all these Cisco lessons, you will see a LOT of show commands that I use to explain things. There are also debug commands. These show commands only produce “static” information. If you want to see changes, you have to use the same show command a couple of times. Debug commands allow us to see things in real-time. You will see some examples of debug commands in other lessons.
When you take a new switch out of the box, it will work right away with its default (empty) configuration. It will behave just like any other unmanaged switch, it will start learning MAC addresses and forwards Ethernet frames.
However, you probably want to make some changes to the configuration of your switch. Change its default hostname, perhaps add an IP address so you can manage it remotely, etc.
To do this, we have to use configuration mode. In this mode, we can make changes to the configuration of the switch. Here’s how you enter configuration mode:
Switch>enableFirst, you need to make sure you are in enable mode. Now you can use the following command:
Switch#configure terminalWith the configure terminal command, we enter configuration mode. Now we can make changes to the switch.
Let’s start with something simple, let’s change the name of our switch with the hostname command:
Switch(config)#hostname SW1 SW1(config)#You can see this is applied immediately. Our switch is now called SW1.
The command above was executed in “global” configuration mode. When we want to make changes to interfaces or console settings, we have to dive into one of the configuration sub modes. Let me give you an example, let’s say we want to add a password to the console:
SW1(config)#line console 0 SW1(config-line)#password cisco SW1(config-line)#loginFirst, we use the line console 0 command to dive into the line configuration. You can recognize this because it shows (config-line). I used the password command to specify a password (cisco) and the login command to tell the switch to ask for this password. Next time you access the console, it will ask for this password.
If I want to get back to global configuration, I have to type exit or press CTRL+Z:
SW1(config-line)#exit SW1(config)#I’m now back in the global configuration mode.
Let me give you one more example, let’s say we want to make changes to one of our interfaces:
SW1(config)#interface FastEthernet 0/1 SW1(config-if)#First, I use the interface command and specify the interface that I want to make changes to. You can see we are now in the interface sub-mode as it shows (config-if) to us.
Once you enter the interface configuration, the switch does not show you which interface you selected. Only that you are in the sub-mode configuration.
I can now make some changes to this interface, let’s try a few commands:
SW1(config-if)#description CONNECTION_TO_DESKTOP SW1(config-if)#duplex full SW1(config-if)#speed 100 Above you can see I added a description and changed the duplex/speed settings of this interface. If I want to get back, I can use the exit command or CTRL-Z:
SW1(config-if)#exit SW1(config)#The first time, it jumps back to global configuration mode. The second time I do it, we jump back to enable mode and exit the configuration mode:
SW1(config)#exit SW1#Here is a picture to help you visualize the different modes and how to move from one to another:
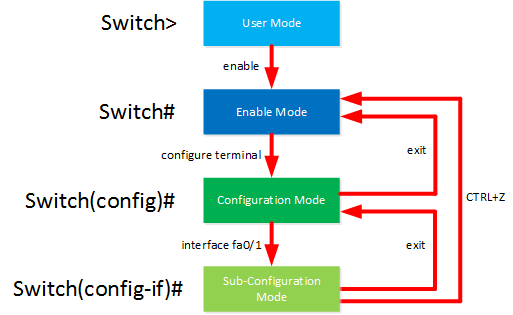
We entered a couple of commands but once we pull the power plug, everything is gone…
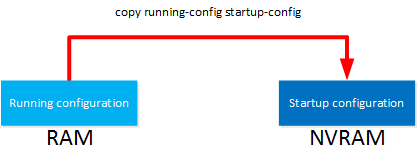
Why? Everything we configure on our switch is applied to the running configuration. This configuration is only active in RAM, pull the plug and it’s gone.
If we want to save our configuration, we have to save it as the startup configuration which is saved in NVRAM. Next time we boot our switch, it will look for the startup configuration and use that.
Here’s how to copy our running configuration to the startup configuration:
SW1#copy running-config startup-config Destination filename [startup-config]? Building configuration. [OK] 0 bytes copied in 1.182 secs (0 bytes/sec)Use the copy command to copy the running configuration to the startup configuration.
Here’s a simple illustration to help you visualize the two configuration files:
Another popular command to save your configuration is “wr”. This is short for write and the old command to save your configuration. It does the exact same thing as copy running-config startup-config which is why it’s still very popular.
You have now seen the basics of Cisco IOS. We used some show commands and a few configuration commands. The CLI has some tricks up its sleeve to make your life easier. Let’s discuss these…
Not sure what the command was again or how to type it? The question mark is your friend. If you use it, it will tell you all possible commands:
SW1#? Exec commands: access-enable Create a temporary Access-List entry access-template Create a temporary Access-List entry archive manage archive files beep Blocks Extensible Exchange Protocol commands cd Change current directory clear Reset functions clock Manage the system clock cns CNS agents configure Enter configuration modeThe question mark works in user, enable and configuration mode so go ahead and try it everywhere. It also helps you finding out which commands are possible. For example:
SW1#cl? clear clockIf I type cl? then the CLI tells me there are two possible commands:
Let’s take a closer look at the clock command as it’s a great example to explain the question mark a bit more. If I want to set the time, what format should it be? It could be 18:00, 6PM, 6:00PM or anything else. the question mark will help us figure out what the command requires:
SW1#clock ? set Set the time and dateFirst, it tells us that we need to use clock set. Let’s try that:
SW1#clock set ? hh:mm:ss Current TimeClock set tells us that time should be in hh:mm:ss format so let’s enter that:
SW1#clock set 14:05:00 ? Day of the month MONTH Month of the yearNow it tell us that it needs a day and month. Let’s try the month first:
SW1#clock set 14:05:00 November ? Day of the monthWe still have to enter the day, let’s do that:
SW1#clock set 14:05:00 November 8 ? YearFinally, we have to enter the year. Let’s do this:
SW1#clock set 14:05:00 November 8 2016 ?
Now we only see which means that the clock command has everything it needs. Remove the question mark and hit enter:
SW1#clock set 14:05:00 November 8 2016 SW1#The clock is now configured.
There is no need to type the exact command for CLI to accept it. You can also shorten commands. For example, I just used copy running-config startup config but I don’t have to type the entire thing. This will also work:
SW1#copy run stAfter the copy command, there is only one parameter that starts with “run” which is running-config. The only parameter that starts with “st” is startup-config. Once you get more experience with the CLI and become familiar with the different commands, you will automatically use this more often.
In a perfect world, we would remember everything and make no spelling errors. In real life, this happens all the time. Luckily for us, the CLI has something to help. Let’s try the clock command again:
SW1#clock set 14:05:00 8 % Incomplete command.The switch tells us that the command is incomplete. This is because I didn’t add a month or year, when this happens…use the question mark to figure out what the command requires.
What if I make a typing error?
SW1#clock set 14:05:00 8 11 ^ % Invalid input detected at '^' marker.The CLI complains but does show the ^ symbol to tell me where I made an error. When this happens, remove whatever you typed in above the ^ symbol and use the question mark:
SW1#clock set 14:05:00 8 ? MONTH Month of the yearThis tells me that I should have typed November, not 11.
There are a couple of useful keyboard shortcuts that you can use for the CLI.
Cisco IOS keeps a history of previously entered commands. All you need to do is press the up and down arrow keys to browse through your previous commands.
With the left and right arrow keys, you can move the cursor one character in either direction. If you want to make some changes to a very long command that you are trying to enter, it might be a bit annoying to keep one of the arrow keys pressed. Instead, try the CTRL+A or CTRL+E combinations. This will make the cursor jump to the start or end of the line.
No idea how to spell a certain command? The TAB button will auto-complete commands for you. For example, try typing this:
SW1#show mac adAnd then hit the TAB button. The CLI will auto-complete it to:
SW1#show mac address-tableThis saves some typing and you don’t have to think about silly things like remembering if the command has a space or dash in between.
If you hit the TAB button a couple of times and nothing happens, try the question mark. There will be more than one command that starts with the same letters.
If you are in the configuration mode, you will face the following issue if you try a show command:
SW1(config)#show version ^ % Invalid input detected at '^' marker.Why? The command is typed correctly but the problem here is that this is a command for the enable mode, not the configuration mode.
You could exit the configuration mode but instead, you can add do in front of the show command:
SW1(config)#do show version Cisco IOS Software, C3560 Software (C3560-IPSERVICESK9-M), Version 12.2(55)SE10, RELEASE SOFTWARE (fc2) Technical Support: http://www.cisco.com/techsupport Copyright (c) 1986-2015 by Cisco Systems, Inc.What if you want to get the output of a show command but you don’t have to see everything? For example, look at the following show command:
SW1#show version Cisco IOS Software, C3560 Software (C3560-IPSERVICESK9-M), Version 12.2(55)SE10, RELEASE SOFTWARE (fc2) Technical Support: http://www.cisco.com/techsupport Copyright (c) 1986-2015 by Cisco Systems, Inc. Compiled Wed 11-Feb-15 11:34 by prod_rel_team Image text-base: 0x01000000, data-base: 0x02F00000 ROM: Bootstrap program is C3560 boot loader BOOTLDR: C3560 Boot Loader (C3560-HBOOT-M) Version 12.2(44)SE5, RELEASE SOFTWARE (fc1) [output omitted]This produces quite some output. What if I only want to see the IOS version that this switch has? We can use some output modifiers:
SW1#show version ? | Output modifiersAt the end of your show command, add the | symbol. Let’s look at our options:
SW1#show version | ? append Append redirected output to URL (URLs supporting append operation only) begin Begin with the line that matches count Count number of lines which match regexp exclude Exclude lines that match format Format the output using the specified spec file include Include lines that match redirect Redirect output to URL tee Copy output to URLThe two I personally use most often are begin and include. Let’s try both:
SW1#show version | include IOS Cisco IOS Software, C3560 Software (C3560-IPSERVICESK9-M), Version 12.2(55)SE10, RELEASE SOFTWARE (fc2)Include will only show me the line that have “IOS” in them.
Begin will start the output with the word you are looking for. For example, let’s say I am only interested in the interface configuration from the running configuration. Here’s how to do this:
SW1#show running-config | begin interface interface FastEthernet0/1 description CONNECTION_TO_DESKTOP speed 100 duplex full ! interface FastEthernet0/2 ! interface FastEthernet0/3 [output omitted]Instead of seeing the entire running configuration, it will skip the first part of the output and starts with the interfaces instead.
You have now learned the basics of Cisco IOS and how to connect to the CLI. Here are some of the things we discussed:
I hope this lesson has been useful, the best thing to do now is to boot up a switch and try all of this by yourself.